
Coat only after professional moisture testing and full decontamination confirm the slab is ready, not just when it looks dry. Applying epoxy or polyaspartic over a wet or contaminated slab almost always ends in bubbling, blistering, or peeling within months. The decisive step is a passing result on ASTM F1869 or ASTM F2170 testing. If contaminated water or mold was involved, call a remediation specialist before you call a coating contractor.
TL;DR:
- Moisture testing using ASTM F1869 or ASTM F2170 is essential before coating to prevent failure, and results must be documented in writing.
- Decontamination, drying, and mechanical surface profiling are critical steps that significantly influence the coating’s durability after flooding.
- Coatings like epoxy or polyaspartic require a fully dry and decontaminated slab, and ongoing vapor drive from groundwater remains a persistent challenge.
- Rushing the coating process without proper testing and preparation increases the risk of costly failures, often requiring full removal and reapplication.
- Flood-damaged slabs typically need 60 to 90 days of drying in contaminated cases, with active dehumidification speeding up timelines dramatically.
Table of Contents
- What Happens to Concrete When a Garage Floods
- What To Do in the First 48 Hours After a Garage Flood
- Repair or Remove? Reading the Damage on an Existing Coating
- The Surface Prep and Testing Sequence That Actually Prevents Failures
- Which Coatings Hold Up After a Flood, and Which Don’t
- What a Post-Flood Recoat Actually Costs and How Long It Takes
- What To Ask an Installer Before You Sign Anything
- How Precision Concrete Coating Approaches Flood-Damaged Garages
- The Biggest Preventable Mistake After a Garage Flood
- Get Your Garage Back After a Flood the Right Way
- Key Standards and Resources for Homeowners
- Sources
- FAQ
What Happens to Concrete When a Garage Floods
Concrete is porous, and floodwater doesn’t just sit on top of it. Water works into the capillary structure of the slab and can carry sediment, bacteria, or chemical runoff several inches deep. That’s why a slab can feel bone dry to the touch on day three while still holding enough internal moisture to wreck a coating installed on day thirty.
Drying timelines depend heavily on how bad the flooding was and how humid your region is.
- Minor, clean-water flooding: testing can often begin around 30 days after the water recedes.
- Significant or contaminated flooding: plan on 60 to 90 days or more before the slab is ready for testing, let alone coating.
- Humid climates: these timelines stretch further without intervention, since ambient moisture in the air slows evaporation from the slab.
Active drying speeds things up considerably. Running commercial dehumidifiers continuously and keeping garage doors sealed shut rather than propped open for “fresh air” pulls moisture out of the concrete far faster than passive airing ever will. In Texas humidity, skipping this step can add weeks to your timeline.
What To Do in the First 48 Hours After a Garage Flood
Speed matters here, but so does sequence. Rushing the wrong step wastes the time you save on another.
- Extract standing water immediately using a pump or a wet/dry vacuum, and pull out anything stored on the floor before it becomes a contamination source itself.
- Sort and separate contaminated materials. Cardboard, drywall, and porous storage items that touched floodwater usually need to be discarded, not dried and reused.
- Disinfect if contamination is suspected. If the water came from sewage backup or street runoff, use commercial-grade disinfectants or bring in a remediation contractor rather than relying on household cleaners.
- Set up airflow and dehumidification right away, and track both ambient humidity and slab moisture trends over the following weeks rather than guessing when things “feel” dry.
None of this replaces testing. It just gets the slab to the point where testing means something.
Repair or Remove? Reading the Damage on an Existing Coating
A flooded garage with an existing coating puts you at a fork in the road, and the wrong call here is expensive.
- Watch for bubbles, blisters, or lifted edges anywhere the old coating touched standing water.
- Tap suspicious spots. A hollow sound or a soft give underneath usually means the bond has already failed, even if the surface still looks intact.
- Don’t trust a spot repair on flood damage. Moisture and contaminants typically remain trapped under the coating in areas beyond the visible failure, so a patch job tends to fail again within a season.
- When in doubt, remove it entirely. Full removal through diamond grinding, followed by decontamination, drying, and moisture testing before recoating, gives you a floor that’s actually starting from zero rather than hiding a problem under new material.
The Surface Prep and Testing Sequence That Actually Prevents Failures
Most coating failures don’t come from a bad product. They come from a skipped step, and installer consensus points squarely at prep and testing as the usual culprits.
- Mechanical profiling first. Diamond grinding or shotblasting removes the weak laitance layer and creates the surface roughness a coating actually needs to bond. Pressure washing alone can leave excess moisture behind without creating that profile, which is why acid etching and rinsing shouldn’t be your only prep method after a flood.
- ASTM F1869 calcium chloride testing measures moisture vapor emission from the surface over a set period.
- ASTM F2170 relative humidity probes measure moisture at a specific depth inside the slab, which is why RH probes are often the preferred method when a slab has been saturated. A surface reading can look fine while the interior is still holding water.
- Watch for hydrostatic pressure. If groundwater keeps pushing moisture upward through the slab, testing alone won’t solve it. You may need a sump pump, better drainage, or a moisture-mitigating primer designed for high vapor drive before any coating goes down.
Pro Tip: Ask your contractor for the actual numeric test results in writing, not just a verbal “it passed.” A real report includes the ASTM method used, the reading, and the date it was taken.
Homeowners who want to walk through the testing process step by step can check the moisture testing guide for a plain-language breakdown of what each number means.
Which Coatings Hold Up After a Flood, and Which Don’t
Once a slab passes testing, the coating choice comes down to how much protection you need and what your moisture readings actually showed.
- 100% solids epoxy and polyaspartic topcoats create a continuous, nonporous film that resists staining and abrasion well, but both require a genuinely dry, decontaminated substrate. Skip that, and the film traps whatever moisture remains underneath.
- Penetrating silane or siloxane sealers reduce water absorption into the concrete but don’t form a surface film. They’re a reasonable prevention tool for a garage that hasn’t flooded, but they’re not a substitute for a full coating system if you want the durability and finish of a traffic-grade floor.
- No coating survives ongoing vapor drive. If hydrostatic pressure is still active, even a high-quality moisture-mitigating primer has a limited lifespan, and the real fix is addressing the water source, not the coating.
What a Post-Flood Recoat Actually Costs and How Long It Takes
Cost swings widely depending on how much remediation the slab needs before a coating crew ever shows up.
- Decontamination and disposal of ruined materials and contaminated debris.
- Extended drying and dehumidification, which adds equipment rental time to the bill.
- Moisture testing, ideally documented with written ASTM results.
- Diamond grinding, crack repair, and any moisture-mitigating primer if testing calls for it.
- Coating material and labor for the final epoxy or polyaspartic system.
A minor, clean-water flood might require several weeks to complete drying and testing. A major flood involving contaminated water can extend the timeline substantially due to additional remediation, testing, and drying.
Rushing rarely saves money. A coating that fails over trapped moisture usually means paying for full removal and starting the entire process over, on top of whatever you already spent the first time.
What To Ask an Installer Before You Sign Anything
A short phone call can save you from a five-figure mistake. Ask these questions before you hire anyone for post-flood work.
- “Which moisture test will you use, and will I get written results?” Insist on the ASTM method and the actual numeric reading, not a verbal assurance.
- “How will you handle surface prep and any mold or contamination?” The answer should include mechanical profiling, not just cleaning, and a clear plan if testing turns up biological contamination.
- “What primer do you use if moisture readings come back high?” A contractor who has no answer here likely hasn’t dealt with flood-damaged slabs before.
- “Can I see references from other flood-damaged projects, and what does the warranty require?” A warranty that doesn’t tie back to documented prep steps isn’t worth much.
Pro Tip: A low bid that skips written moisture test results is the single biggest red flag in post-flood garage coating quotes. Prep and testing take time, and time costs money. If a bid seems too cheap, ask what’s being left out.
How Precision Concrete Coating Approaches Flood-Damaged Garages
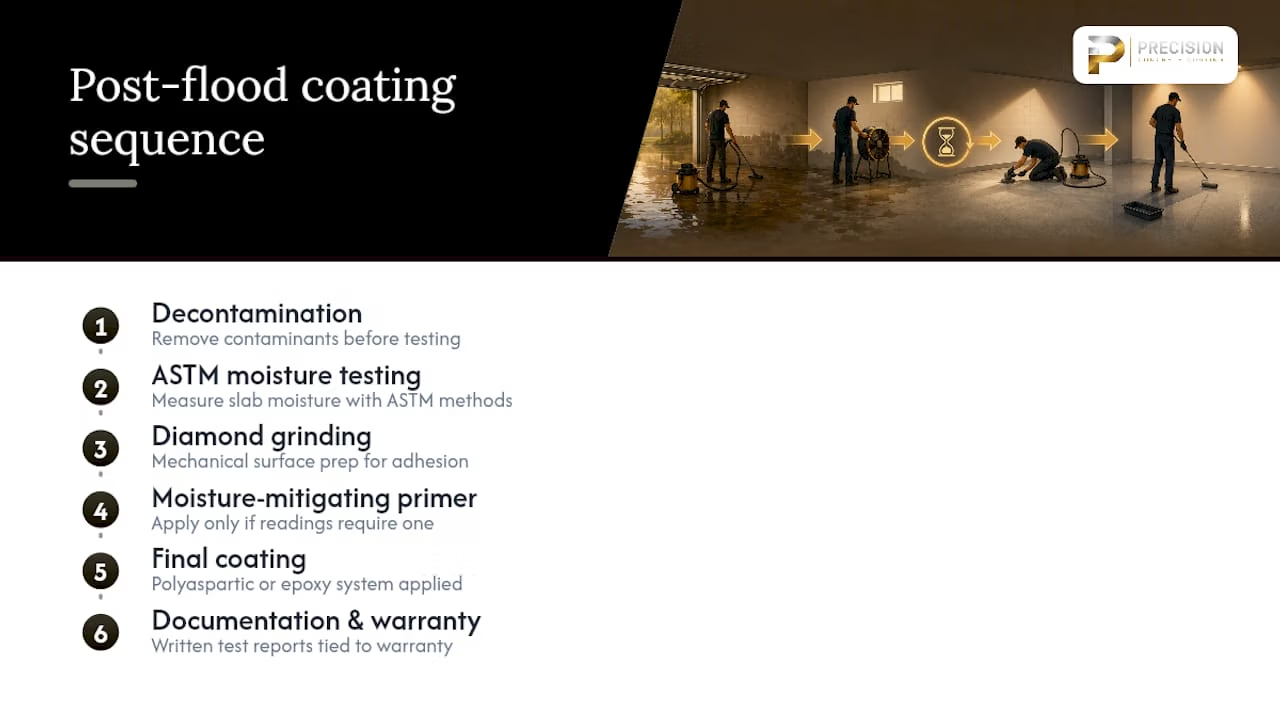
Every post-flood project should be built around documentation: decontamination first, then ASTM moisture testing, then diamond grinding, then a moisture-mitigating primer if the readings call for one, and finally a polyaspartic or epoxy system. A long-term residential warranty is best tied to that documented prep, which is exactly why homeowners should ask for written test reports rather than taking a verbal “it’s dry” at face value. For homeowners who want to see how mechanical prep plays out on a real Conroe-area slab, the Granger Pines garage floor case study walks through the process from start to finish.
The Biggest Preventable Mistake After a Garage Flood
Rushing to coat is the single most expensive mistake homeowners make after a flood. The floor looks dry, the calendar says it’s been long enough, and the temptation to just get it done wins. Insist on documented ASTM testing and real mechanical prep instead. When the readings are borderline, hire someone certified in flood remediation and wait it out. It’s cheaper than doing the floor twice.
— William
Get Your Garage Back After a Flood the Right Way
A lot of garage floor companies will quote you a price over the phone without ever mentioning moisture testing. Precision Concrete Coating in Conroe TX won’t, because a coating installed on a slab that hasn’t passed ASTM F1869 or F2170 testing is a coating that’s going to fail. The estimate process includes documented moisture readings, diamond grinding to correct the surface profile, crack repair where needed, and a written scope of work that spells out exactly what’s being done before any polyaspartic or epoxy goes down.

That documentation matters most when it comes to the warranty. Precision Concrete Coating’s 15-year residential warranty is contingent on the prep steps being followed and recorded, so you’re not just trusting a verbal promise. If your garage flooded and you’re not sure whether the slab is ready, find out how long you’ll need to wait before parking on a new coating and request a written estimate to get the testing process started.
Key Standards and Resources for Homeowners

For readers who want to dig into the technical side, the AMPP guidance on concrete moisture testing covers both ASTM methods in detail. The ITRC epoxy floor coatings information sheet explains vapor drive and mitigation options, and Coast Pro Coatings’ post-flood guidance offers realistic drying timelines. Homeowners preparing for a Conroe-area installation can also review prep guidance for local slabs or partner insight on epoxy floor prep.
Sources
- Concrete moisture testing and mitigation — AMPP
- Concrete coating after flood damage | Coast Pro Coatings
- Epoxy floor coatings technology information sheet — ITRC (2026)
- Rapidrepair
FAQ
What Should I Do First After My Garage Floods?
Extract standing water immediately, remove anything that touched the floodwater, and disinfect if sewage or runoff contamination is possible. Then set up dehumidification and airflow, but don’t apply any coating until the slab passes professional moisture testing.
How Long Does a Garage Floor Coating Typically Last?
A properly installed epoxy or polyaspartic system on a slab that passed moisture testing and had correct mechanical prep can last well over a decade. Coatings applied over trapped moisture or contamination fail far sooner, often within months.
What Is a Flood Coat Epoxy?
The term generally refers to a thicker, self-leveling epoxy application designed to fill minor surface irregularities and create a uniform base coat before a topcoat goes on. It still requires the same dry, decontaminated, properly profiled substrate as any other epoxy system to hold up long-term.
What Does It Cost To Epoxy a Two-Car Garage Floor After a Flood?
Costs vary widely based on how much decontamination, drying, and repair the slab needs before coating can even begin. A minor clean-water flood with a straightforward recoat sits on the lower end of a four-to-eight-week timeline, while a contaminated flood requiring remediation and repeat testing pushes both cost and timeline higher, often into the eight-to-sixteen-week range.