
Most residential garage slabs poured to standard specs handle everyday passenger cars without issue. The moment you add an RV, a two-post lift, a loaded trailer, or dense workshop equipment, the math changes fast. Garage floor load bearing capacity explained simply: a typical 4-inch slab on a well-compacted base meets the IBC’s 40 psf live-load baseline for passenger vehicles, but anything heavier usually requires a 5–6 inch slab, engineered reinforcement, or both.
Before you park anything heavy, take three quick steps:
- Measure your slab thickness at an exposed edge or a floor drain cutout.
- Walk the floor and note any cracks wider than 1/8 inch, vertical offsets, or soft spots.
- Write down the GVWR of every vehicle or piece of equipment you plan to store, then compare that against the guidance below.
If you’re planning a car lift or storing a loaded trailer, consider core testing or consulting a structural engineer before proceeding.
Table of Contents
- What actually controls your garage slab’s strength
- How to estimate your garage floor’s load capacity yourself
- Real-world loads and what they mean for your slab
- Options to repair or strengthen your garage floor
- Where coatings fit in — and what they genuinely do
- U.S. code benchmarks and site-prep facts every homeowner should know
- Testing options and what they cost
- Key Takeaways
- The part most homeowners get backwards
- Precision-concretecoating: surface prep and coating after your slab is confirmed sound
- Useful sources
What actually controls your garage slab’s strength
Four variables determine how much weight your slab can carry. Get one wrong and the others can’t compensate.
Concrete compressive strength (psi). Code-derived benchmarks set minimum compressive strengths for garage slabs, interior slabs, and footing portions specified by code. These aren’t suggestions — they’re the floor. Ordering generic ready-mix without specifying strength often gets you a weaker mix than your garage needs.
Slab thickness and reinforcement. A 4-inch slab is the residential baseline for standard parking. Heavy trucks, RVs, and loaded trailers typically require a slab thicker than the standard residential baseline. Rebar adds post-crack integrity and resists point loads; wire mesh helps with shrinkage cracking but contributes less to structural capacity than properly placed rebar. Fiber reinforcement reduces micro-cracking but is not a substitute for rebar under concentrated loads.
Subbase and soil bearing capacity. A stiff, well-compacted subbase distributes load across a wider area before it reaches the soil. Soft clay beneath a slab forces the concrete to span unsupported zones, which is where cracks and settlement originate. The subgrade’s k-value (modulus of subgrade reaction) directly affects how thick the slab needs to be — soft soils can demand significantly thicker slabs or engineered fill.
Point loads vs. distributed loads. A 4,000-pound sedan spreads its weight across four tire contact patches, producing a distributed load well within a standard slab’s capacity. A two-post lift concentrates the same force (or more) onto two post pads, creating point loads that can punch through an unreinforced slab even if the total weight seems manageable.
| Variable | Standard Residential | Heavy Use / Lifts |
|---|---|---|
| Compressive strength | 3,500 psi | 4,000–5,000 psi |
| Slab thickness | 4 inches | 5–6 inches |
| Reinforcement | Wire mesh or #4 rebar | #4 rebar + engineered pads |
| Subbase | 4–6" compacted gravel | Engineered fill or geotextile |
Key figure: The IBC sets the minimum floor live load for passenger vehicle garages at 40 psf. A standard 4,000-pound sedan distributed across four tires typically falls within that range on a properly prepared slab.
How to estimate your garage floor’s load capacity yourself
-
Record every intended load. List each vehicle’s GVWR, any trailer tongue weight, rack systems, and equipment. Car lifts are a special case: most manufacturers require a minimum 6-inch slab and engineered reinforcement at post locations. Confirm those specs before purchasing.
-
Measure slab thickness. Check at a floor drain, an exposed edge near the garage door, or a small core drilled in an inconspicuous corner. Four inches is the standard baseline; anything under 3.5 inches is a red flag for anything heavier than a compact car.
-
Do a visual inspection. Walk the entire floor and mark cracks with chalk. Note any crack wider than 1/8 inch, any vertical offset between crack edges, soft or hollow-sounding areas (tap with a hammer), and any settlement near the perimeter or door threshold.
-
Run a rough load check. Divide the vehicle’s GVWR by the floor area it occupies (length × width of the parking space in square feet). Compare that number to the 40 psf baseline. Most passenger cars pass easily; a loaded 26-foot RV at 26,000 pounds over a 10×26-foot footprint produces roughly 100 psf — well above what a standard 4-inch slab was designed for.
-
Escalate when the numbers or the visual don’t look right. Order a core sample with a lab compressive test if you’re unsure of your concrete’s actual strength. Request a plate-bearing test if you suspect soft subgrade. Call a structural engineer when point loads exceed manufacturer thresholds, when you see vertical offsets, or when settlement is progressing.
Pro Tip: Take dated photos of every crack before placing any new heavy load. If cracking progresses after loading, you have a clear before-and-after record for your engineer or contractor.
Real-world loads and what they mean for your slab
| Load Type | Typical Weight | Slab Demand | Recommended Minimum |
|---|---|---|---|
| Compact / midsize sedan | — | Low | 4" slab meeting minimum compressive strength requirements |
| Full-size pickup (empty) | 5,000 lbs | Moderate | 4" slab meeting minimum compressive strength requirements |
| Loaded pickup or SUV | — | Moderate-high | 4–5" |
| RV or loaded trailer | 26,000+ lbs | High | A thicker, engineered slab is recommended |
| Two-post car lift | Varies by capacity | Point load critical | 6" minimum + pads |
| Heavy workshop equipment typically requires additional reinforcement and a thicker slab than standard residential specifications. |
Heavy storage racks deserve special attention. A loaded steel shelving unit with 2,000 pounds of parts rests on four small feet, concentrating that weight into roughly 4 square inches per foot. Spread the load with plywood or steel base plates under each leg — it’s a simple fix that dramatically reduces point-load stress on the slab.

Pro Tip: For car lifts, pull the manufacturer’s installation manual before you pour or before you buy. Many specify not just slab thickness but also rebar size, pad dimensions, and minimum concrete strength — often 4,000 psi or higher.
Options to repair or strengthen your garage floor
Bonded overlays and structural toppings add a thin layer of high-strength concrete over the existing slab. They improve surface durability and can spread point loads slightly, but their effectiveness depends entirely on the condition of the slab beneath. A delaminating or settled slab needs more than a topping.
Partial or full slab replacement is the right answer when the existing concrete is below minimum strength, heavily cracked, or poorly reinforced. A new 5–6 inch slab with proper rebar and a compacted subbase resets the structural baseline completely.
Underpinning and grade beams address the root cause when poor subgrade or footing failure is driving the problem. These are engineered solutions that require a structural engineer’s design and permit approval.
Engineered lift pads are localized reinforced concrete sections poured at post locations for car lifts. They typically involve dowels into the existing slab, additional rebar, and a higher-strength mix. Lift manufacturers’ installation specs govern the design — follow them exactly.
Critical point: Coatings and sealers do not increase structural load-bearing capacity. They protect the surface, resist moisture and chemicals, and extend slab life after structural repairs are complete. Applying a coating over an unrepaired structural problem hides the symptom without fixing the cause.
Where coatings fit in — and what they genuinely do
Epoxy and polyaspartic coatings protect concrete surfaces. They seal against moisture intrusion, resist oil and chemical staining, and make the floor easier to clean. What they don’t do is add meaningful structural capacity or stop an active crack from progressing.
The right sequence is always structural first, coating second. Once your slab is confirmed sound or repaired, a quality coating system extends its life significantly. Precision-concretecoating’s process illustrates this well: the Granger Pines garage floor project in Conroe, TX, involved on-site evaluation, crack repair, mechanical diamond surface preparation to achieve the correct concrete surface profile, and a full decorative flake system with a UV-stable polyaspartic topcoat. The prep work came first — every time.
Services that belong after structural repairs are confirmed:
- Mechanical diamond grinding for proper surface profile
- Crack and pitting repair before coating application
- Moisture mitigation treatment where vapor transmission is present
- Full-flake decorative epoxy or solid-color base coats
- UV-stable polyaspartic topcoats for long-term protection
Pro Tip: If a contractor offers to coat over active cracks without addressing the structural cause first, that’s a red flag. Coatings applied over moving cracks will reflect those cracks through the surface within months.
U.S. code benchmarks and site-prep facts every homeowner should know
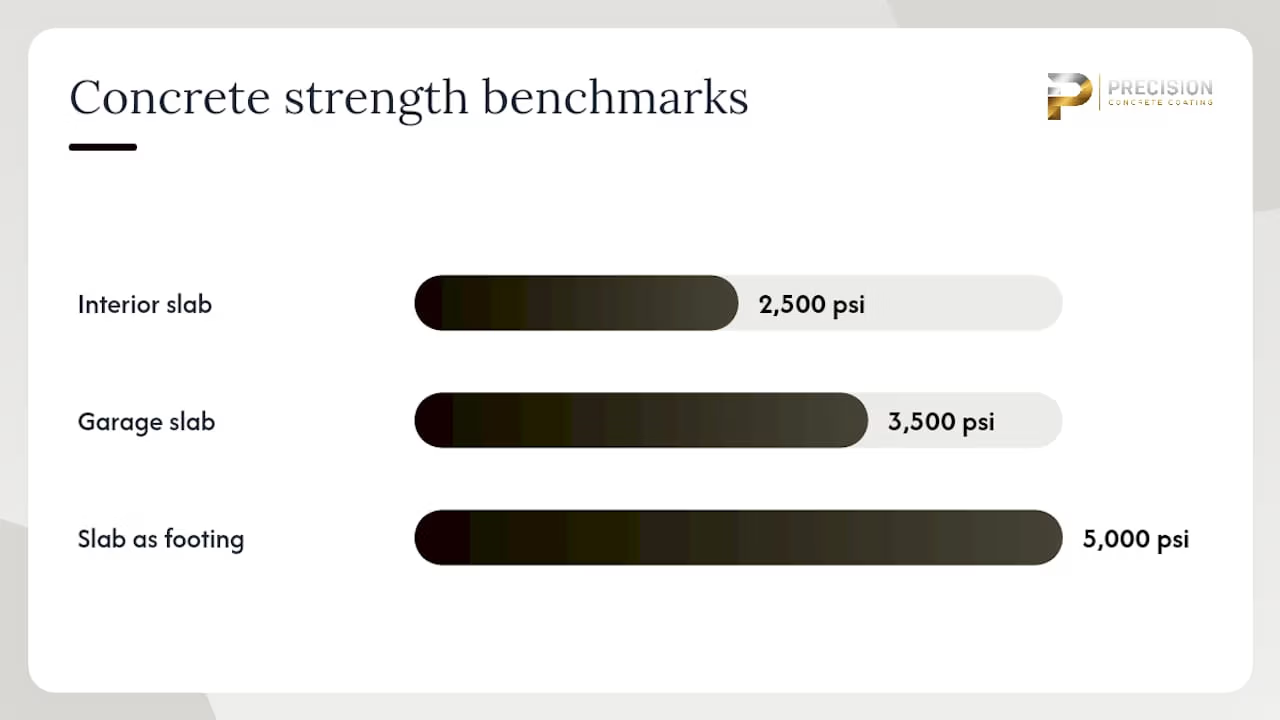
The Fridley, MN concrete slab guidance — derived from widely adopted code standards — gives homeowners three psi numbers to remember: 3,500 psi for garage slabs, 2,500 psi for interior slabs, and 5,000 psi where the slab acts as a footing. When ordering ready-mix, tell the supplier your project type and required strength. Saying “garage slab with thickened edge footing, 3,500 psi” gets you the right mix; ordering “concrete” does not.
Drainage slope matters more than most homeowners realize. The standard requirement is a 6-inch drop in the first 10 feet away from the structure. Poor drainage lets water pool beneath the slab, eroding the subbase over time and reducing the effective support the soil provides.
For rebar, the same code guidance specifies two rows of #4 rebar around the perimeter of garage slabs, with lap lengths of at least 40 bar diameters. Placement depth matters too: the top row should sit roughly one-third of the slab depth from the top surface. Rebar sitting on the subbase instead of properly supported in the middle-to-upper zone of the slab provides far less tensile resistance where it’s needed.
| Situation | When local AHJ or engineered design is required |
|---|---|
| Car lift installation | Almost always — confirm with local building department |
| Commercial or mixed use | Required in most jurisdictions |
| Suspect or soft soil conditions | Geotechnical report typically required |
| Unusual point loads | Structural engineer stamp required |
Ordering tip: A low water-cement ratio (≤0.5) helps concrete reach its specified strength and reduces permeability. Ask your ready-mix supplier to confirm the mix design meets your target psi before the truck rolls.
Testing options and what they cost
- Core sample with lab compressive test: A contractor drills a 3–4 inch core from your slab, and a certified lab crushes it to measure actual psi. This is the most direct way to confirm your concrete’s strength. Ballpark cost is $200–$600 depending on the number of cores and local lab rates; results typically come back within a week.
- Plate load (bearing) test: A steel plate is loaded incrementally to measure how much the subgrade deflects under load. Useful when you suspect soft subgrade rather than weak concrete. Costs vary widely by region and test scope.
- Geotechnical soil report: A geotechnical engineer drills borings and analyzes soil bearing capacity. Necessary when you’re planning significant structural changes or when soft clay is suspected. Budget $500–$2,000+ depending on site complexity and number of borings.
Share all test results with your structural engineer before making any repair or reinforcement decisions. The test data tells the engineer what they’re working with; the engineer tells you what to do about it. For regional context on how code and cost assumptions play out in practice, garage construction guides from general contractors can offer useful comparative perspective, though always verify against your local AHJ’s requirements.
Key Takeaways
A standard 4-inch, 3,500 psi garage slab on a compacted base handles passenger vehicles safely, but lifts, RVs, and heavy equipment require a thicker, reinforced slab and often an engineered design.
| Point | Details |
|---|---|
| Concrete strength baseline | Garage slabs need at least 3,500 psi; slab portions acting as footings require 5,000 psi. |
| Thickness by use | 4" for standard parking; 5–6" for heavy trucks, RVs, or car lifts. |
| Point loads are the real risk | Lift posts and rack legs concentrate weight — engineered pads and rebar placement matter most here. |
| Coatings don’t add capacity | Epoxy and polyaspartic systems protect the surface; structural repairs must come first. |
| Precision-concretecoating’s role | After structural repairs are confirmed, Precision-concretecoating provides crack repair, diamond prep, and polyaspartic coating with a 15-year residential warranty. |
The part most homeowners get backwards
Most of the questions homeowners ask about garage floor strength focus on the concrete itself — the psi, the thickness, the rebar. Those details matter, but the variable that causes the most real-world failures is the one you can’t see: what’s underneath.
A 4-inch, 3,500 psi slab on a poorly compacted subbase or expansive clay soil will crack and settle under loads that the same slab on a well-prepared base would handle for decades. The concrete gets the blame, but the subgrade is the actual culprit. Before spending money on overlays or coatings, it’s worth knowing whether the support beneath the slab is the weak link.
The other thing worth saying plainly: coatings are not a structural fix, and no reputable contractor will tell you otherwise. They’re a protection layer — a very good one when applied correctly over a sound slab. The sequence matters. Structural assessment, then repair if needed, then coating. Skipping the first two steps and going straight to a coating is how you end up with a beautiful floor that cracks through in 18 months.
Precision-concretecoating: surface prep and coating after your slab is confirmed sound
Once your slab passes a structural check or you’ve completed necessary repairs, the surface still needs proper preparation before any coating will bond and last. That’s where Precision-concretecoating delivers real value for homeowners in Conroe, TX, and the surrounding North Houston area.

The process starts with mechanical diamond grinding to open the concrete surface and achieve the correct profile for adhesion, followed by crack and pitting repair, moisture mitigation where needed, and a full decorative system — flake broadcast, base coat, and a UV-stable polyaspartic topcoat built to handle Texas heat and daily vehicle traffic. The Granger Pines case study shows exactly how that workflow plays out on a real residential project. Every installation comes with a 15-year residential warranty.
Ready to move forward? Read the homeowner guide to parking on a new coating to understand curing timelines, then request a written estimate from Precision-concretecoating to get your project scoped.
Useful sources
- Concrete Slabs
- Garage Concrete Floor Construction: Thickness, Mix, and Reinforcement
- Garage Structural Engineering: Load Calculations and Span Design
- How Thick Should a Garage Floor Be? 4" vs 6" Guide
- Garage Concrete Floor Slab – Construction, Thickness and Cost
- Can You Park On A New Garage Floor Coating? | Homeowner Guide
- Granger Pines Garage Floor Coating Case Study | Conroe TX