
Epoxy can be used in an attached garage, but only when ventilation, garage-to-house sealing, and professional prep pass a brief safety checklist. CDC/NIOSH occupational guidance flags liquid epoxy components as skin sensitizers, and federal building science research shows garage air can migrate into living space. If your garage is poorly sealed, houses a furnace or water heater, or you can’t ventilate and glove up properly, delay the project or hire a prep-focused installer like Precision Concrete Coating instead of mixing epoxy yourself.
TL;DR:
- Liquid resin and amine hardeners can cause skin sensitization, while grinding creates dust; use gloves rated for epoxy, eye protection, and an organic vapor respirator.
- DIY kits often fail within one to three years without grinding or moisture tests; properly prepared layered systems can last beyond a decade.
- A professional installation costs $4.50 to $7.50 per square foot, with repairs and flake coverage affecting cost; require moisture results and prep details in writing.
- Polyaspartic can allow vehicle traffic within a day and resists UV yellowing; polished concrete suits slabs with heavy moisture problems.
Table of Contents
- How safe is applying epoxy in an attached garage?
- How epoxy coatings work and how long they actually last
- Surface prep and moisture testing you need to know about
- What the professional application process looks like
- Costs, lifespan, and comparing DIY kits vs. professional installation
- Alternatives to epoxy for attached garages
- Precision Concrete Coating’s prep-first approach to garage floors
- Balancing safety, performance, and value in a garage coating decision
- Get a prep-first garage floor assessment from Precision Concrete Coating
- FAQ
- Sources
How safe is applying epoxy in an attached garage?
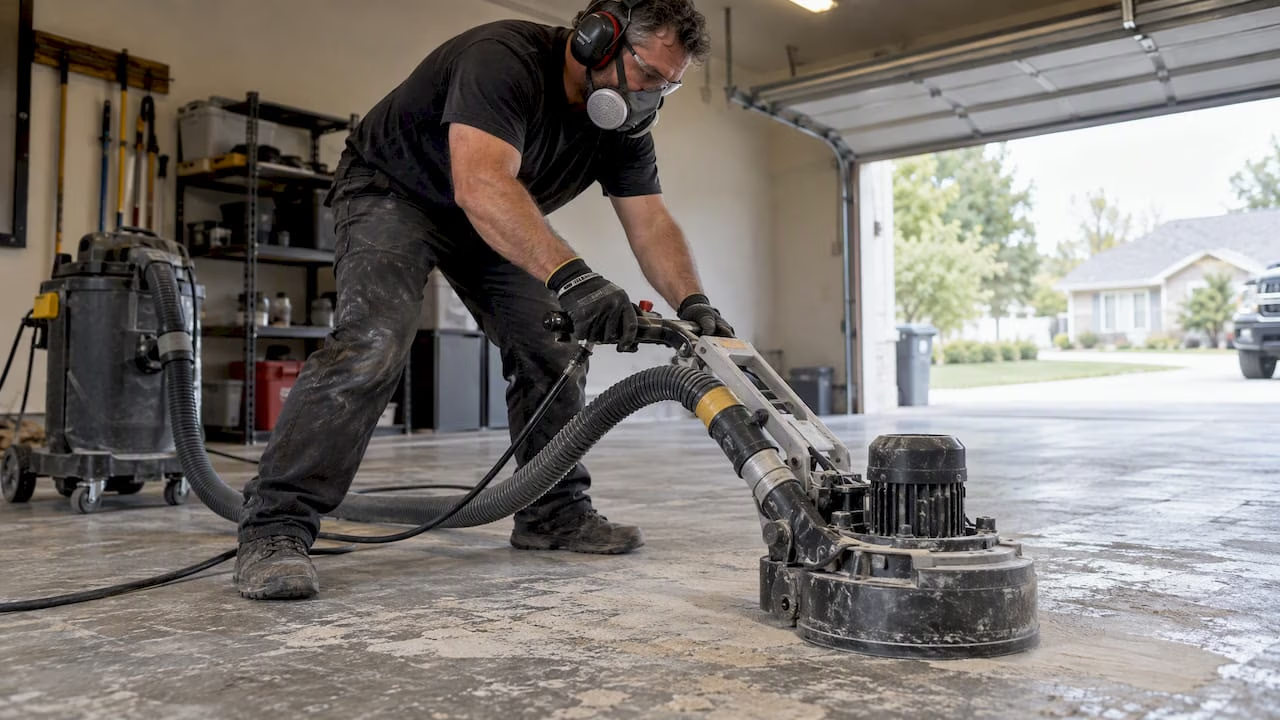
The main hazard isn’t the cured floor. It’s the liquid resin and amine hardener during mixing and application, plus the dust from grinding an old coating off beforehand. CDC/NIOSH guidance identifies amine hardeners as a leading cause of occupational skin sensitization, and once someone becomes sensitized, even brief future contact can trigger a serious reaction. That risk doesn’t go away after one project; it accumulates with repeat exposure, which is one reason professional crews rotate PPE and limit direct skin contact rather than treating gloves as optional.
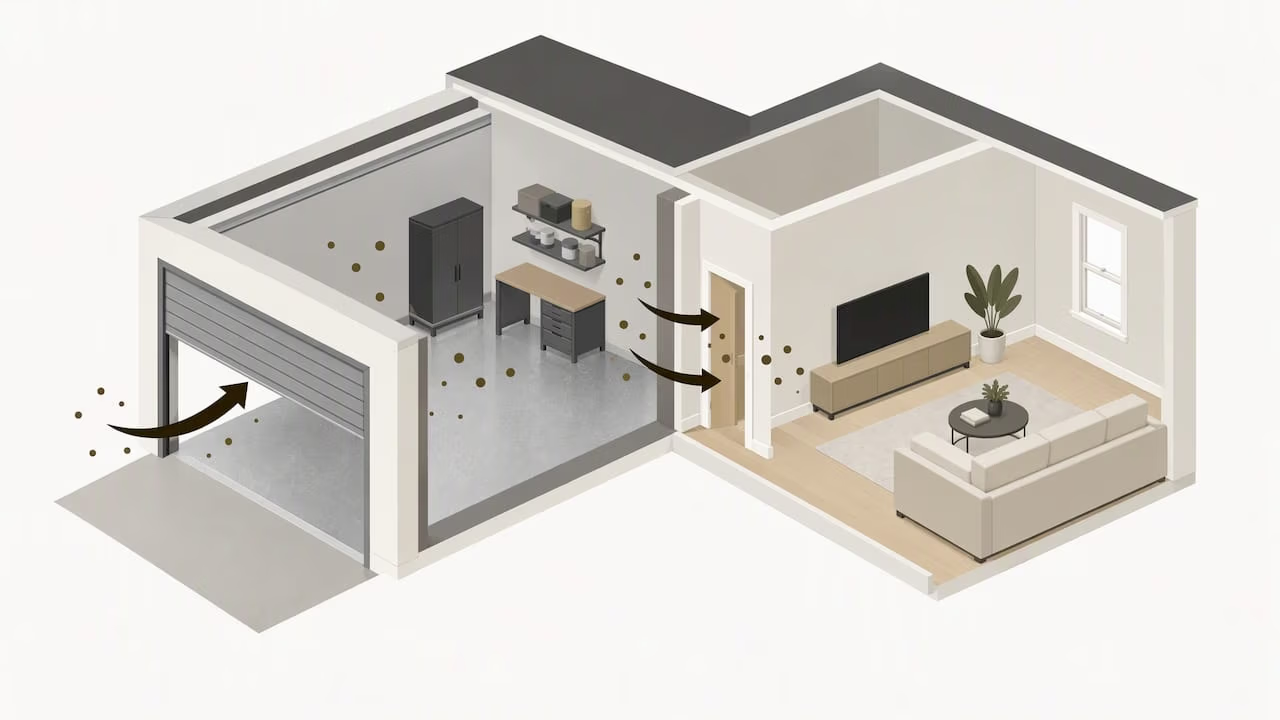
The second concern is where the epoxy floor fumes go. Research tracking volatile organic compounds between garages and homes found that pollutant levels in an attached garage can elevate indoor air in the connected house, and federal Building America field tests confirmed that supply ventilation substantially suppressed that transfer compared with exhaust-only setups. DOE and EPA building guidance recommends sealing the garage-to-house air boundary, weatherstripping the connecting door, and verifying ventilation strategy before any wet coating work begins.
Practical steps that matter during a coating job:
- Wear nitrile or butyl gloves rated for epoxy resins, plus eye protection and a respirator suited to organic vapors.
- Run continuous exhaust ventilation pointed outdoors, not just a box fan recirculating air inside the garage.
- Seal or weatherstrip the door to the house, and avoid propping it open for convenience during application.
- Shut down the HVAC return if the air handler sits in the garage, since a running return duct can pull vapors into the house.
- Keep the space clear of pilot lights or running combustion appliances until cure is well underway.
Pro Tip: If your water heater or furnace shares the garage, have a contractor confirm appliance shutoff timing and reentry windows before coating day, not after the odor shows up inside the house.
A field study found that a measurable fraction of a house’s total air exchange can come from the attached garage, with elevated benzene in homes traced to garage sources, underscoring why sealing and ventilation aren’t optional extras for attached garages.
How epoxy coatings work and how long they actually last
A garage epoxy system is built in layers, and each one does a different job. A primer coat soaks into the concrete’s surface profile and creates a mechanical key for everything above it. A pigmented base coat follows, often with decorative flakes broadcast into it while still wet. A topcoat, either a harder epoxy or a UV-stable polyaspartic, seals the system and provides the wear layer you walk and park on.

Adhesion is mechanical, not just chemical. The primer needs a roughened, porous surface to grip, which is why grinding matters more than many homeowners expect. A smooth or sealed slab gives the primer nothing to bite into, and that’s the single most common reason coatings peel or lift within the first year.
Realistic lifespan depends heavily on what happens before the coating goes down:
- A well-prepped multi-layer epoxy system with a polyaspartic topcoat commonly lasts well beyond a decade with normal garage use.
- Moisture trapped under the slab, skipped grinding, or rushed cure times are the usual causes of early failure, sometimes within a year or two.
- UV exposure near open garage doors tends to yellow plain epoxy faster than polyaspartic, which resists UV better.
A written warranty is only as good as the prep behind it, which is why the documentation step matters as much as the material choice.
Surface prep and moisture testing you need to know about
Before any primer touches the slab, two things have to happen: mechanical profiling and a real moisture check. ACI’s specification for epoxy overlays treats both as mandatory, not optional, because skipping either is a documented cause of delamination.
- Grind or shot-blast the slab to open its pore structure; acid etching alone rarely creates enough profile for a long-lasting bond on an older garage floor.
- Run a moisture test, either a plastic sheet test (ASTM D4263) for a quick check or an in-situ relative humidity test under ASTM F2170 for a documented reading, and delay coating if results exceed the coating manufacturer’s threshold.
- Repair cracks and treat control joints so they don’t telegraph through the new coating or trap moisture underneath it.
- Degrease any oil-stained areas thoroughly, since residual oil prevents the primer from bonding even on a properly ground surface.
- Apply the primer within the manufacturer’s specified window after grinding, since an open profile left exposed too long can pick up dust and contaminants that block adhesion.
A homeowner can run a basic DIY moisture check before committing to a project, though it won’t replace an in-situ RH reading with documented results.
Pro Tip: Ask any contractor for the actual moisture test numbers in writing, not just a verbal “it’s fine.” A documented reading protects you if the floor fails early.
A professional installer should hand you a moisture report, a written scope describing the grinding method and surface profile achieved, and sometimes an adhesion pull test result on a sample patch. That paperwork is the difference between a floor backed by evidence and one backed by a guess.
What the professional application process looks like
A properly run installation follows a predictable sequence, and knowing it helps you evaluate a contractor’s bid.
- Initial assessment, including a slab inspection for cracks, prior coatings, and visible moisture issues.
- Moisture testing per ASTM F2170 or a comparable protocol, with results documented before scheduling the coating date.
- Mechanical grinding to create the surface profile the primer needs, followed by crack repair and joint treatment.
- Degreasing and a final clean to remove grinding dust and any remaining oil residue.
- Primer application, timed to the manufacturer’s recoat window.
- Base coat application, often with decorative flake broadcast while the base is still tacky.
- Topcoat application, either epoxy or a UV-stable polyaspartic, which also sets the final cure timeline.
- Cure and reentry period, typically allowing foot traffic sooner than vehicle traffic, with full cure taking longer.
Ventilation runs continuously through steps five, six, and seven, and a careful crew will keep the garage door open or exhaust fans running rather than sealing the space to “protect” the fresh coat. Installations commonly get pushed back when the weather turns humid, when a moisture test fails and needs mitigation first, or when a water heater or HVAC unit sitting in the garage needs special handling before work can start.
Costs, lifespan, and comparing DIY kits vs. professional installation
A retail DIY epoxy kit is the cheapest upfront option, but most lack the mechanical grinding step and rely on acid etching, which shortens expected lifespan considerably. Professional installation runs in the range Precision Concrete Coating publishes for garage floor coatings, $4.50 to $7.50 per square foot, with the spread driven by crack repair needs, decorative flake density, and topcoat choice.
- DIY kits often fail within one to three years when the slab wasn’t properly profiled or tested for moisture first.
- Professionally prepped multi-layer systems with a polyaspartic topcoat commonly outlast a decade of normal use.
- A 15-year residential warranty is only meaningful when backed by documented moisture testing and a written prep scope, not a verbal assurance.
- A solid quote should include the grinding method, moisture test results, flake or topcoat specification, and warranty terms in writing.
Ask for the moisture report before signing anything. It tells you whether the slab was ready, not just whether the installer was available that week.
Alternatives to epoxy for attached garages
Epoxy isn’t the only coating that makes sense for an attached garage, and the right call depends on slab condition, climate, and how the space gets used.
- Polyaspartic coatings cure far faster than epoxy, often allowing vehicle traffic within a day, and resist UV yellowing better near open garage doors.
- Polished concrete skips wet coatings almost entirely, which appeals to homeowners who want a lower-VOC finish and a more industrial look.
- Urethane cement toppings handle chemical exposure and thermal cycling well, making them a fit for garages that double as workshops.
- A slab with heavy moisture issues or frequent temperature swings often does better with polished concrete than with any wet-applied coating.
Precision Concrete Coating’s prep-first approach to garage floors
A coating is only as good as what happens before it goes down, and that’s the part Precision Concrete Coating builds its process around. Our installations start with mechanical diamond grinding rather than acid etching, documented moisture testing, and crack repair before any primer touches the slab. From there, homeowners can choose a full-flake broadcast system, a solid-color epoxy, or a UV-stable polyaspartic topcoat depending on how the garage gets used.
- Every job includes a written moisture report and a documented prep scope, not just a verbal summary.
- Crack repair and joint treatment happen before coating, addressing the issues that cause early failure.
- Our 15-year residential warranty reflects that prep-first sequence rather than standing on its own.
A long-term residential warranty usually backs installations like these, tied directly to the documented grinding and moisture testing performed on each job. Homeowners comparing quotes should ask every installer for that same level of documentation before deciding.
Balancing safety, performance, and value in a garage coating decision
If your garage shares a wall, door, or HVAC return with living space, sealing and ventilation aren’t a footnote, they’re the first decision to make. DIY makes sense on a detached garage with good airflow and a slab you’ve already moisture-tested. For anything attached to the house, a prep-first contractor who documents moisture readings and surface profile is worth the premium. The single best move right now: get a moisture test done before you buy a single gallon of epoxy.
— William
Get a prep-first garage floor assessment from Precision Concrete Coating
A coating that skips moisture testing and mechanical prep is a coating that fails early, and in an attached garage, that failure can mean fumes reaching the rest of the house. We run documented moisture tests, mechanical diamond grinding, and crack repair before any primer goes down, then offer full-flake, solid-color, or UV-stable polyaspartic systems to match how you use the space.

- Mechanical prep and documented moisture testing on every job, not a verbal guess.
- Crack repair and joint treatment handled before coating, not patched over afterward.
- A 15-year residential warranty backed by that documentation.
Request a written estimate and on-site moisture assessment before your next garage project, and see what proper prep actually costs.
FAQ
What is the downside to an epoxy garage floor?
The main downside is sensitivity to prep quality: a floor coated without mechanical grinding or moisture testing can peel, bubble, or fail within a year or two. Liquid epoxy also requires careful handling, since CDC/NIOSH guidance links hardener exposure to skin sensitization if PPE and ventilation aren’t used properly.
How much does it cost to put epoxy in your garage?
Professional epoxy garage floor installation typically runs $4.50 to $7.50 per square foot, depending on crack repair needs and decorative finish choice. DIY kits cost less upfront but often lack the mechanical prep that determines how long the coating lasts.
How long will epoxy last in a garage?
A properly prepped multi-layer epoxy system with a polyaspartic topcoat commonly lasts well beyond a decade under normal garage use. Lifespan drops sharply when moisture testing or mechanical grinding gets skipped during installation.
What’s better than epoxy for a garage?
Polyaspartic coatings cure faster and resist UV yellowing better than standard epoxy, making them a strong fit for garages with frequent sun exposure through an open door. Polished concrete is a lower-VOC alternative worth considering on slabs in good condition where a different aesthetic is acceptable.
Is it safe to apply epoxy if my garage is attached to my house?
It can be safe when the garage-to-house air boundary is sealed and ventilation runs continuously during application, as federal building science testing confirms reduces vapor transfer into living space. Homeowners with combustion appliances or HVAC returns in the garage should have a contractor confirm shutoff and reentry timing before the project starts.
Sources
- CDC/NIOSH occupational guidance on epoxy sensitization
- Energy Savings Plus Health: IAQ Guidelines for Single-Family Renovations
- Building America case study: Air leakage and air transfer between garage and living space
- ACI Specification 548.8 (epoxy multi-layer overlays) — preview
7 Responses