If your epoxy garage floor has turned yellow, cleaning won’t bring back the clarity, and a fresh clear coat won’t stop it from happening again. The discoloration is a chemical change inside the cured resin, and in most cases it’s permanent. The good news: if the coating is still bonded tight to the concrete, you can usually stop it from getting worse by grinding the surface lightly and applying a UV-stable topcoat. Start by checking whether the coating is peeling or tacky before you decide on a fix.
TL;DR:
- Yellowing caused by UV exposure is usually confined to areas near windows or doors, indicating the need for UV-stable topcoat application.
- If the yellow tint is uniform across the floor, it results from aging or improper mixing, and replacing the coating might be necessary.
- Removing blush before recoating is crucial if solvent residue lifts a milky film; otherwise, the discoloration is embedded in the resin.
- Recoating with a clear epoxy won’t fix existing yellowing; pigmented overlays or full removal are effective alternatives for concealment or correction.
- Proper surface preparation, moisture control, and choosing a UV-stable coating at installation can prevent yellowing and extend the floor’s aesthetic lifespan.
Table of Contents
- What Causes a Yellowing Epoxy Floor?
- Why Does Epoxy Turn Yellow in the First Place?
- Can a Yellowing Epoxy Floor Actually Be Fixed?
- How Do You Prevent Yellowing on a New or Recoated Floor?
- Should You DIY the Topcoat or Call a Professional?
- What Precision Concrete Coating in Conroe TX Has Learned About Preventing This
- The Real Lesson Behind Yellowing Epoxy Floors
- Sources
- FAQ
What Causes a Yellowing Epoxy Floor?
The pattern of the discoloration tells you almost everything. If the amber tint traces the shape of a window or garage door, sunlight is the culprit. If it shows up as random blotchy patches with no relationship to light sources, you’re probably looking at amine blush, a byproduct of the curing reaction. A uniform, even tint across the whole floor usually points to plain aging or an off-ratio mix from the original installation.
Here’s a simple way to work through it:
- Check the pattern first. Band-shaped yellowing near windows or under skylights is almost always UV exposure. This single diagnostic step is the most reliable way homeowners can tell UV damage apart from blush or mixing errors.
- Look at the gloss. A glossy but ambered surface usually means the resin itself has oxidized. A hazy, dull, or cloudy finish points toward blush sitting on top of the coating rather than inside it.
- Press and scratch a test spot. Soft, tacky, or bubbling areas signal a cure or adhesion problem, not simple color change.
- Wipe with solvent. If a rag with denatured alcohol lifts a milky residue, that’s blush you can remove. If nothing comes off, the yellowing is baked into the film.
- Do a small grind or scuff test. Sanding a coin-sized spot and comparing color underneath tells you if the tint runs through the whole coating or just the top layer.
Once you know the cause, the fix follows naturally: sound but ambered floors need a topcoat, blush needs removal before recoating, and anything peeling or tacky needs full prep and a redo, usually by a professional.
Why Does Epoxy Turn Yellow in the First Place?
Ultraviolet light breaks chemical bonds in the cured epoxy and forms new molecular structures called chromophores, which absorb light differently and show up to your eye as a yellow or amber cast. That reaction happens inside the resin itself, so no amount of cleaning removes it. Industry testing shows visible yellowing can appear within 3 to 6 months of direct sun exposure and within 12 to 18 months under typical indoor fluorescent lighting.
Heat and humidity add a second pathway. Hygrothermal aging studies have traced yellowing in common amine epoxies to carbonyl formation, a chemical byproduct of oxidation that doesn’t reverse even after the material dries back out. That’s why a floor that yellows near a hot water heater or a south-facing garage door often shows the same permanent tint as one that’s been baking in direct sun.
Mixing errors matter too. Amine blush forms when moisture or temperature swings interfere with the cure, and off-ratio mixing (too much hardener, not enough resin, or the reverse) accelerates visible yellowing early on. Chemistry also decides how fast this happens: standard epoxies use aromatic ring structures that absorb UV readily, while aliphatic polyurethanes and polyaspartic coatings use molecular structures that resist that absorption, which is why they hold their color for years longer.

Can a Yellowing Epoxy Floor Actually Be Fixed?
You have real options, but none of them un-yellow the resin that’s already discolored. What you’re really deciding is whether to cover the tint, remove it, or start over.
- Topcoat over sound epoxy. If the floor passes the tape and scratch tests, a light diamond grind or mechanical scuff creates the surface profile a UV-stable polyaspartic coating or aliphatic polyurethane needs to bond. This stops further ambering, but it will not erase the yellow that’s already there underneath a clear topcoat.
- Grind and recoat. Peeling, bubbling, soft spots, or contamination mean the bond has failed somewhere in the system. That calls for full mechanical removal and a fresh install, and it’s typically a job for a professional crew with diamond grinding equipment.
- Pigmented or opaque overlay. A solid color or decorative flake system hides existing ambering completely, but it still needs a UV-stable topcoat on top, or the new system will eventually yellow the same way.
- Skip the “just add more clear epoxy” fix. A fresh coat of standard aromatic epoxy over a yellowed floor buys you almost nothing in a sun-exposed garage. It’s the same chemistry that failed the first time.
Pro Tip: If you’re grinding old epoxy yourself, use a vacuum-shrouded grinder with HEPA filtration to follow demand silica controls for adhesive removal from concrete. Dry-sanding cured epoxy without dust control kicks up fine particulate you don’t want to breathe, and it’s a common corner-cutting mistake on DIY jobs.
Polyaspartic products cure fast, often within an hour, so mix only what you can apply before it starts to set, and check the manufacturer’s working-time window before you start rolling.
How Do You Prevent Yellowing on a New or Recoated Floor?
The fix that actually holds up long-term is choosing the right topcoat chemistry from the start, not fighting UV damage after it appears.
- Spec an aliphatic or polyaspartic topcoat on any floor that gets direct sun through a window or garage door, or even strong indoor lighting for long stretches of the day.
- Get moisture and mix ratios right. Ask whoever installs your floor about moisture testing and mixing procedure. Off-ratio mixing and trapped moisture both accelerate blush and early yellowing.
- Limit UV exposure where you can. Window film on garage windows and keeping the overhead door closed during peak sun hours both slow the clock on ambering.
- Store unmixed components correctly. Resin and hardener that sit in a hot garage or direct sun before use degrade faster, which shows up as faster yellowing once applied.
- Choose pigmented finishes if color stability matters most to you, and ask for a written warranty that specifically covers color change, not just adhesion or wear.
Routine upkeep still plays a role. Regular sweeping and prompt cleanup of oil or chemical spills protects the topcoat’s surface and extends the interval before you need to think about recoating at all, something covered in more detail in garage floor coating maintenance guidance.
Should You DIY the Topcoat or Call a Professional?
Match the job to what your floor actually needs, not to what’s easiest to buy at a hardware store.
- DIY makes sense when the yellowed area is small, the coating passes adhesion checks, and you’re comfortable following prep and mix instructions to the letter.
- Call a professional when you see delamination across a large area, standing moisture issues, or when the fix requires diamond grinding or shot blasting equipment most homeowners don’t own.
- Weigh the safety and time factors. Polyaspartic coatings often set within an hour, HEPA dust control matters during grinding, and proper ventilation and PPE aren’t optional with fast-cure products.
- Factor in warranty coverage. Professional installers can typically back UV-stable systems with a written warranty, offering homeowners a concrete benchmark to ask about.
What Precision Concrete Coating in Conroe TX Has Learned About Preventing This
Most yellowing complaints trace back to two things: skipped surface prep and the wrong topcoat chemistry for the amount of sun a garage gets. Some installers build every installation around thorough substrate preparation and moisture mitigation first, then recommend UV-stable polyaspartic protection for garages that see direct sunlight through windows or open doors, which covers most of Texas.
If you’re talking to any installer, not just us, ask directly what topcoat chemistry they’re specifying and whether they test for moisture before they start. Those two questions separate a floor that holds its color for over a decade from one that ambers within a year. For homeowners weighing a full recoat, our guide on preparing a garage before a coating installation walks through what proper prep actually involves.
The Real Lesson Behind Yellowing Epoxy Floors
Most homeowners treat yellowing as a sign they bought a bad product or a contractor did shoddy work. Usually, that’s the wrong read. Standard clear epoxy is aromatic chemistry, and aromatic chemistry absorbs UV light and ambers over time by design, not by defect. The floor isn’t failing. It’s doing exactly what that resin family does when it sees sunlight.
Where the conventional advice falls short is treating yellowing like a cleaning problem or telling homeowners to “just add another coat of epoxy.” That’s a temporary patch on a chemistry problem, and it wastes money on a system that will yellow again on the same timeline.
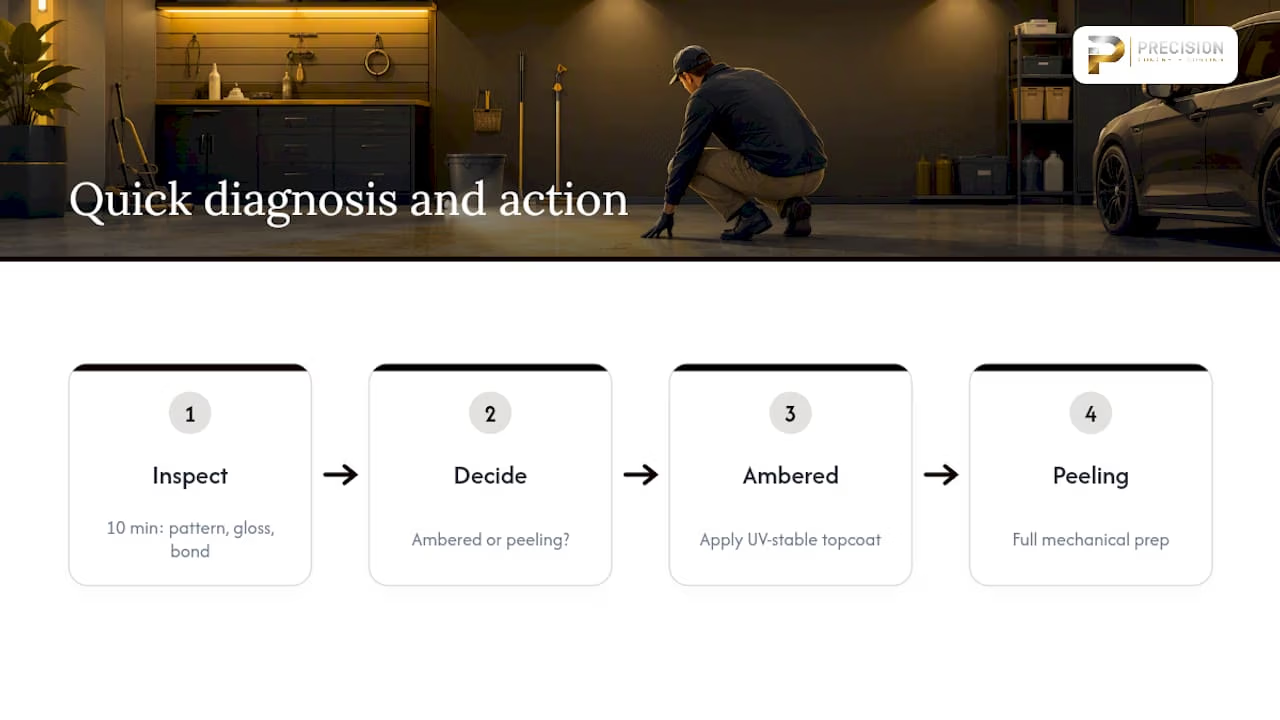
What should you prioritize first? Not the fix, the diagnosis. Spend ten minutes checking the pattern, the gloss, and whether the coating is still bonded tight before you spend a dollar on materials. A floor that’s sound but ambered needs a UV-stable topcoat. A floor that’s peeling needs full mechanical prep. Getting that distinction right the first time saves you from redoing the job twice.
— William
Sources
- Overcoming UV Degradation in Epoxy Coating Systems (white paper)
- Mechanism of Yellowing: Carbonyl Formation during Hygrothermal Aging in a Common Amine Epoxy
- Why Is My Epoxy Floor Turning Yellow? | Trade Epoxy
FAQ
How Do You Fix a Yellowed Epoxy Floor?
If the coating is still well bonded, lightly grind or scuff the surface and apply a UV-stable polyaspartic or aliphatic polyurethane topcoat. This stops further yellowing, though it won’t remove the existing tint underneath a clear coat; pigmented or flake overlays hide it completely.
Is a Yellowed Epoxy Floor Still Good, or Does It Need Replacing?
Yellowing alone is usually cosmetic and doesn’t mean the floor has failed structurally. It only signals a deeper problem when paired with peeling, bubbling, soft spots, or tackiness, which point to adhesion failure and typically require full removal and recoating.
How Long Does It Take for Epoxy to Start Yellowing?
Under direct sunlight, visible yellowing can appear within 3 to 6 months. Under indoor fluorescent lighting with no direct sun, the same change often takes 12 to 18 months to become noticeable.
Why Is My Epoxy Floor Turning Yellow?
The leading cause is UV photo-oxidation, which permanently alters the resin’s chemical structure. Heat, humidity-driven oxidation, amine blush from the curing process, and off-ratio mixing during installation can all contribute or speed up the same effect.